REVIEW · BUDAPEST
Explore Budapest in Pictures: Guided Tour Photo Tour
Book on GetYourGuide →Operated by Solange colque · Bookable on GetYourGuide
Budapest with your camera in hand is different. This 3-hour Budapest photo tour keeps things simple and hands-on, with a small group and coaching on composition and light from the start point at the Chain Bridge area. One thing to consider: there have been reports of the guide not arriving as expected, so double-check your confirmation before you head out in bad weather.
I like that it’s designed for all skill levels. You get practical photography advice as you move from Buda Castle cobblestone lanes to the standout ceiling at Matias Church, plus you’ll receive extra photos from the guide after the walk.
In This Review
- Key points before you go
- How This Budapest Photo Tour Feels in Real Life
- Meeting at the Umbrella: Simple… But Don’t Guess
- Chain Bridge: Panoramas and Leading Lines on Daylight
- Buda Castle: Cobblestone Streets and City-View Angles
- Castle Quarter Side Streets: Find Architecture Details, Not Just Big Stops
- Matias Church: How to Photograph Bright Ceiling Color
- Parliament of Budapest: Gothic Details and the Timing Game
- Heroes’ Square Finale: Statues, Perspective, and a Strong Last Set
- Price and Value: What $17 Really Covers
- What to Bring for Better Photos (and Less Stress)
- Who This Tour Suits Best (and Who Should Rethink It)
- Should You Book This Budapest Photo Tour?
- FAQ
- How much is the Explore Budapest in Pictures photo tour?
- How long does the tour last?
- Where do I meet the guide?
- What language is the live guide?
- Are museum or monument entrance fees included?
- Will I get photos from the guide?
- Do I need my own camera?
- What should I bring with me?
- Is there any refund option if I cancel?
Key points before you go

- Small-group, individualized help so you’re not stuck guessing your camera settings solo.
- Chain Bridge to Heroes’ Square route hits big views and close-up details in one walk.
- Coaching on framing and light tailored to your level, using monuments and everyday scenes.
- Extra photos mailed to you so you leave with more than just what you shot.
- Spanish-language live guide led in Spanish only, so plan accordingly if you’re not comfortable.
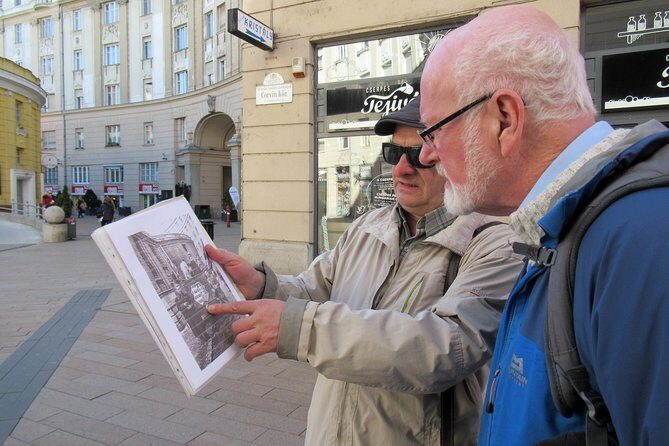
How This Budapest Photo Tour Feels in Real Life

This tour is built for one thing: getting better pictures without turning your trip into a classroom. You’re not just sightseeing. You’re practicing—with a local guide walking you between the city’s most photogenic stops and talking through what to watch for as you shoot.
For me, the best part is the vibe: it’s relaxed, friendly, and focused on learning while you look at Budapest the way photographers do. Instead of rushing you through stops, the tour is set up around teaching you how to handle real conditions—strong daylight near landmarks, shadows in side streets, and the challenge of photographing big buildings without turning your images into a blurry mess.
The other reason this works is the route logic. You start with skyline-and-river drama, then move into older streets where textures and small details matter, and you finish with huge squares where perspective and statue angles can make or break your shot.
You can also read our reviews of more guided tours in Budapest


Meeting at the Umbrella: Simple… But Don’t Guess

You’ll meet your guide at the designated spot, and you’ll recognize them because they’ll be wearing an umbrella. That’s straightforward, and it also means you should arrive a few minutes early.
Why the fuss about timing? Because Budapest weather can be brutal, and at least one reported experience involved someone waiting in extreme cold when the guide didn’t show up as expected. So I strongly recommend you take a screenshot of your booking details, keep an eye on any message updates, and plan a backup option if the meeting time comes and goes.
Also note the guide language: Spanish. If you don’t speak Spanish, use a translation app for key phrases like where to stand, which direction to frame, and what light you’re aiming for. You can still follow the visual direction, but communication matters for personalized feedback.
Chain Bridge: Panoramas and Leading Lines on Daylight

The tour kicks off at the Chain Bridge, which is smart. It gives you instant payoff: you can photograph the bridge’s elegant architecture and the wide Danube River views, usually with lots of room to work on composition.
When you’re at a landmark like this, the problem usually isn’t that you can’t take photos. It’s that your photos look flat or too wide. This is exactly where guidance on framing helps. You’ll be thinking about:
- where your main subject sits in the frame
- how to use the bridge as a leading line
- how to avoid blowing out bright areas in the sky
A bonus: bridges are great for practicing because they give you both symmetry and depth. You can experiment with a tighter shot that focuses on structure, then step back for a broader city-and-river scene.
If you’re using your smartphone, you can still work on the same skills. The tour explicitly welcomes both cameras and cell phones, so you’re not forced into a specific setup.
Buda Castle: Cobblestone Streets and City-View Angles

Next, you head toward the Buda Castle area, where the mood changes fast. You go from big open views to stone textures, slopes, and tight corners. That cobblestone feel matters because it creates visual rhythm—patterns that help your photos look intentional instead of random.
This part is where the tour’s light and framing tips become practical. You’ll likely be asked to pay attention to:
- how light hits older stone surfaces
- how to place architecture so it feels balanced
- how to capture city views without losing detail
One helpful approach at Buda Castle is to think in layers. Foreground texture (the stones or a nearby wall), middle layer (the building shapes), and background (the city view). Even if you don’t call it that, that’s how you get images that feel more than just a postcard.
Important detail: entrance fees to get inside specific sights are not included. So your best strategy is to focus on what you can photograph from outside and plan any indoor visits separately if you want them.
Castle Quarter Side Streets: Find Architecture Details, Not Just Big Stops
After Buda Castle, you move through the Castle Quarter streets, and this is where the tour becomes fun for photographers who enjoy small wins. You’ll be looking for unique architectural details like ancient gates and colorful facades—things that are easy to miss when you’re rushing.
This is also where you get taught to photograph both:
- the grandeur of famous monuments
- the small, everyday moments that make a place feel lived-in
That focus is worth real attention. Budapest can be photographed in a hundred ways, but the photos that feel authentic usually come from street-level observations. A doorway detail. A worn stone corner. A line of balconies. A bit of color that frames your subject.
In other words, this section helps you create variety. If your goal is an Instagram feed (or just better memories), this is how you avoid having five nearly identical wide-angle shots.
You can also read our reviews of more photography tours in Budapest


Matias Church: How to Photograph Bright Ceiling Color
At Matias Church, the highlight is the brightly tiled ceiling and the building’s medieval background. It’s a visual magnet, and it rewards the kind of careful attention the tour is built around—especially controlling how you capture intense color and strong light.
One catch: entry to the interior isn’t included in the tour price. So depending on your exact stop timing and your choices that day, you might photograph exterior views only, or you might decide to pay for interior access separately.
Either way, the lesson you can take from this stop is useful even if you skip the inside: tiled surfaces can trick your camera. Bright highlights can blow out, and the ceiling’s color can turn muddy if your exposure isn’t handled well. If you’re working with a smartphone, you can still practice getting a balanced image by paying attention to how the camera meters the scene.
Parliament of Budapest: Gothic Details and the Timing Game
The route continues toward the Hungarian Parliament, one of Europe’s most recognizable buildings. This stop is a big-deal photo moment because it offers both scale and texture.
The tour notes you may have a chance for shots in daylight, and if conditions allow, at dusk when softer light highlights Gothic details. That matters because Parliament looks different depending on the sky. In harsh sun, you can lose subtle stone definition. At dusk, the contrast often shifts so details pop instead of disappearing.
Practical tip for your own planning: if your goal is the best light, you’ll want to keep moving with the group and be ready to shoot when your guide suggests it. Great dusk shots often happen fast because the best moment doesn’t last long.
Also remember this is a photography tour, not a sit-and-stare tour. So you’ll be repositioning, framing, and making quick decisions instead of treating each landmark like a one-hour photo studio.
Heroes’ Square Finale: Statues, Perspective, and a Strong Last Set
You end at Heroes’ Square, which is built for photographers. It has huge monument shapes and clear sightlines, which makes it a great place to refine your perspective before the tour wraps.
This final stop is where your earlier practice pays off. You’ll be thinking about:
- how to keep the main statue or group as your focal point
- how to show scale without making everything look tiny
- how to use the square layout to guide your viewer’s eye
It’s also a smart way to end, because after you’ve spent time working the bridge, the castle lanes, and landmark architecture, you get a controlled space with big lines and strong symmetry potential.
If you’re serious about improving, Heroes’ Square is a perfect comparison scene. You can take a wide shot for context, then switch to a tighter frame that focuses on one figure or detail.
Price and Value: What $17 Really Covers
At $17 per person for 3 hours, this tour is priced like a budget-friendly photography workshop. You’re getting more than sightseeing, because the cost includes a professional photo tour guide with local experience, photographic advice tailored to your level, and help moving between points when needed via local transportation (if necessary).
You also get access to unique angles. That’s the stuff you’d normally spend time hunting for on your own, especially in photo-heavy locations where the best spots are often not the most obvious ones.
And here’s a value piece that matters: the tour includes additional photos taken by the guide, and those will be mailed to you. That means you’re not just walking away with only your own results. It’s a practical safety net if your photos were almost-there but not quite.
What you should expect to pay for separately: meals and drinks, and entrance fees to places that charge, like interior access options tied to monuments. The tour also doesn’t include photographic equipment rental, so if you plan to rent a camera setup, you’ll need to handle that on your own.
Also bring cash, just in case you decide on an interior visit or want backup options for anything you discover on-site.
What to Bring for Better Photos (and Less Stress)
The tour lists a clear packing mix, and it makes sense for a 3-hour walk where you’ll likely be stopping often:
- Comfortable shoes (you’ll be moving between major stops)
- Camera or a charged smartphone
- Food and drinks so you don’t rush hungry
- Comfortable clothes for the weather
- Cash for any entrance fees or extra needs
- Daypack for keeping your essentials organized
- Garbage bag (yes, really) for simple mess control
If you’re aiming for sharp results, charged power is everything. A dead phone is the worst kind of distraction when you’re trying to review shots or adjust settings.
Who This Tour Suits Best (and Who Should Rethink It)
This is a great fit if you want a guided way to practice photography in Budapest without needing expert gear. It’s positioned for photographers of all levels, and the personal approach is meant to help you improve instead of just following along.
It also fits well if your goal is variety: a mix of sweeping views and smaller street-level detail work.
That said, it’s not for everyone. The tour data says it is not suitable for people with mobility impairments, and it is also listed as not suitable for visually impaired people and hearing-impaired people. At the same time, the activity is marked wheelchair accessible. Because those statements conflict, I’d treat it as a question to ask the provider directly before booking.
Finally, the tour is marked as not suitable for people with a cold. If you’re getting sick, consider rescheduling to protect other participants.
Should You Book This Budapest Photo Tour?
I’d book it if you want hands-on photo coaching in a short window and you like structured walking routes. The highlights—small-group attention, tips on composition and light, and the bonus of photos mailed to you—make the $17 price feel reasonable, especially if you’re not already confident with camera basics.
But I’d be cautious if you’re going at a time when waiting outside in bad weather is a deal-breaker. There are reports of the guide not arriving at the umbrella meeting point, which is the kind of problem you can avoid by double-checking messages and being ready with a backup plan.
If you’re okay with that small risk and you’re excited to practice turning Budapest landmarks into better photos, this tour is a smart way to spend a few hours with a camera in your hand.
FAQ
How much is the Explore Budapest in Pictures photo tour?
It costs $17 per person.
How long does the tour last?
The tour lasts 3 hours.
Where do I meet the guide?
You meet at the designated meeting point where the guide will be recognized by wearing an umbrella.
What language is the live guide?
The live tour guide is Spanish.
Are museum or monument entrance fees included?
No. Entrance fees to places that require tickets, such as interiors related to stops like Buda Castle or Matias Church, are not included.
Will I get photos from the guide?
Yes. The guide takes additional photos during the tour, and they will be mailed to you.
Do I need my own camera?
You can bring a camera and cell phone. The tour does not include photographic equipment rental.
What should I bring with me?
Bring comfortable shoes, a camera, food and drinks, comfortable clothes, cash, a daypack, a charged smartphone, and a garbage bag.
Is there any refund option if I cancel?
Yes. You can cancel up to 24 hours in advance for a full refund, and you can also reserve now and pay later.